Transitional Stays Pattern
Hello, strangers! I'm back to post again about those underbust stays from the pre-Regency, in preparation for the Short Stays Sew-Along.
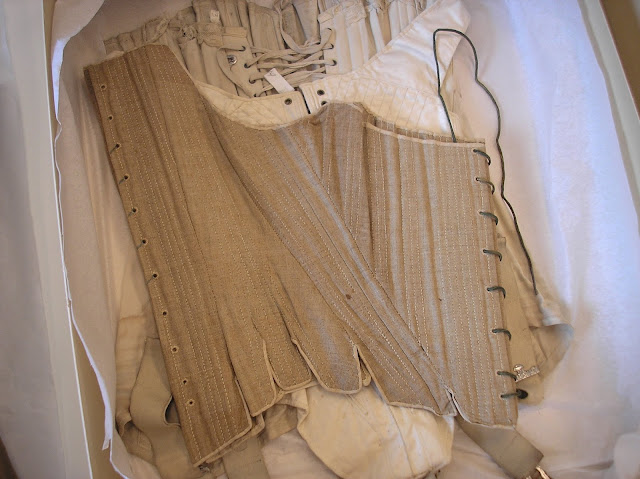

I saw these, as the label suggests, at Historic Cherry Hill in Albany, NY. (I don't believe there was any definite provenance, but the house was owned by the Van Rensselaers and most if not all of the collection is original to the family.) They're quite simple to put together. The above pattern is 1" per grid box, and drawn without seam allowances. Here's my guide for scaling up patterns! The marks at the bottom of the seams should be lined up, and the seams only run down to them.
Materials used in the original:
Process (requires hand-sewing):
1. The two side pieces are cut out of two layers of the canvas. The front and back pieces are cut with the center front and center back on the fold, so that each is technically one piece of fabric folded into two layers.
2. Turn in the seam allowances so they are sandwiched between the layers of each piece. Pin or baste them in place.
3. Sew the boning channels with a backstitch through both layers of each piece, including the turned-in seam allowances.
4. Pierce the eyelets and whipstitch around them, pushing the bodkin through while in progress to keep them open. They should be spaced for spiral lacing both in front and in back. See the classic article The Zen of Spiral Lacing for more explanation of what this means for spacing your eyelets!
5. Put corset pieces right side to right side and whip them together. After sewing, lay each side of the corset out and flatten seams so the edges butt up against each other.
6. Cut bones to fit and slide them into the channels. The curved channels also take straight, unshaped bones; the fabric will fold to accommodate them.
7. Bind the top and bottom edges with tape. Lay the tape on the stays, lining up the edge of the tape with the edge of the stays, and backstitch through the tape and the stays. Then bring the other edge up and over to the inside of the stays and whip it down.
Process for machine-sewing:
1. Cut out the pieces in the same way as above.
2. Pin the outer side of the front piece to the outer side-front piece, right side to right side, the outer side-front piece to the outer side-back, and so on. Do the same with the inner sides/layers, until you have created a tube for each side of the stays.
3. Stitch each of these seams, and press flat. Flatten each side, lining up the side-front, side, and side-back seams and pinning them in place. Pin along the center front and back folds.
4. Sew the boning channels through both layers of the stays.
5. Make eyelets or set in grommets. They should be spaced for spiral lacing both in front and in back. See the classic article The Zen of Spiral Lacing for more explanation of what this means for spacing your eyelets!
6. Cut bones to fit and slide them into the channels. The curved channels also take straight, unshaped bones; the fabric will fold to accommodate them.
7. Bind the top and bottom edges with tape. Lay the tape on the stays, lining up the edge of the tape with the edge of the stays, and sew through the tape and the stays. Then bring the other edge up and over to the inside of the stays and sew through all layers. Unless you've made sure to cut the bones short enough to leave an allowance at the top and bottom, it may be easier to do this part by hand.
Happy sewing!
I've reopened my Patreon, this time going by the Special Post rather than by the month. You can think of it as a tip jar! If you plan on using this pattern and would like to see more, consider joining up.

I saw these, as the label suggests, at Historic Cherry Hill in Albany, NY. (I don't believe there was any definite provenance, but the house was owned by the Van Rensselaers and most if not all of the collection is original to the family.) They're quite simple to put together. The above pattern is 1" per grid box, and drawn without seam allowances. Here's my guide for scaling up patterns! The marks at the bottom of the seams should be lined up, and the seams only run down to them.
Materials used in the original:
- unbleached linen canvas
- linen tape (off-white, but not unbleached) - cotton twill tape is an acceptable substitution
- linen thread (off-white, but not unbleached)
- whalebone - cane or plastic are acceptable modern substitutes
Process (requires hand-sewing):
1. The two side pieces are cut out of two layers of the canvas. The front and back pieces are cut with the center front and center back on the fold, so that each is technically one piece of fabric folded into two layers.
2. Turn in the seam allowances so they are sandwiched between the layers of each piece. Pin or baste them in place.
3. Sew the boning channels with a backstitch through both layers of each piece, including the turned-in seam allowances.
4. Pierce the eyelets and whipstitch around them, pushing the bodkin through while in progress to keep them open. They should be spaced for spiral lacing both in front and in back. See the classic article The Zen of Spiral Lacing for more explanation of what this means for spacing your eyelets!
5. Put corset pieces right side to right side and whip them together. After sewing, lay each side of the corset out and flatten seams so the edges butt up against each other.
6. Cut bones to fit and slide them into the channels. The curved channels also take straight, unshaped bones; the fabric will fold to accommodate them.
7. Bind the top and bottom edges with tape. Lay the tape on the stays, lining up the edge of the tape with the edge of the stays, and backstitch through the tape and the stays. Then bring the other edge up and over to the inside of the stays and whip it down.
 |
| Extreme close-up of boning channels and whipped seams! |
1. Cut out the pieces in the same way as above.
2. Pin the outer side of the front piece to the outer side-front piece, right side to right side, the outer side-front piece to the outer side-back, and so on. Do the same with the inner sides/layers, until you have created a tube for each side of the stays.
3. Stitch each of these seams, and press flat. Flatten each side, lining up the side-front, side, and side-back seams and pinning them in place. Pin along the center front and back folds.
4. Sew the boning channels through both layers of the stays.
5. Make eyelets or set in grommets. They should be spaced for spiral lacing both in front and in back. See the classic article The Zen of Spiral Lacing for more explanation of what this means for spacing your eyelets!
6. Cut bones to fit and slide them into the channels. The curved channels also take straight, unshaped bones; the fabric will fold to accommodate them.
7. Bind the top and bottom edges with tape. Lay the tape on the stays, lining up the edge of the tape with the edge of the stays, and sew through the tape and the stays. Then bring the other edge up and over to the inside of the stays and sew through all layers. Unless you've made sure to cut the bones short enough to leave an allowance at the top and bottom, it may be easier to do this part by hand.
Happy sewing!
I've reopened my Patreon, this time going by the Special Post rather than by the month. You can think of it as a tip jar! If you plan on using this pattern and would like to see more, consider joining up.


What is the size of these stays? For what measurements? Could you please advise?
ReplyDelete