1912 Project - Blouse #0219
This is my second garment for the VPLL 1912 Project, and my first done in normal scale and without any instructions. For fabric, I used a large piece of $2/yd green checked cotton I'd bought for making a muslin a while back, which happened to match up with what the pattern recommended. The reasons I picked this pattern are that I want to be more comfortable with blouse sewing, I'd like a 1912 blouse, and I find the emphasis on the shoulders which was very common from about 1906 on, which is present in the blouse, to be very interesting.
I started off by printing the pattern pieces from the "Oversize A0" pattern file on regular paper, cutting them out and taping them together where necessary, and working out the scale. I then scaled them up onto newspaper by hand. Technically, this isn't necessary, but I prefer doing it this way to printing out 17 pieces of paper and putting them all together. (It would be excellent if one version of the pattern PDFs were arranged for this, with a printed scale!) Since the original pattern was for a 36" bust and I have a 39.5" bust in a modern bra (but less in a corset, although I didn't bother to measure), I added a few inches to the body pieces at the seams just left and right of center front and back; to compensate, I added in the same to the yoke pieces at their seams. After finishing the piecing, I realized that this wasn't the best way to add width: it was still too tight at the shoulders. I should also have slashed the pattern down the sleeve and widened it in that direction as well. Take note, future pattern users! If altering it more, it's important to keep the yoke going out about to the shoulder (which probably helps the sleeve to fit).
At first I was going to sew it all by hand, but a) the point of this project is to figure out the patterns in a decent amount of time, and b) the 1912 home sewer would have had a machine and been happy to use it, so I went with that. Thinking about methods of machine-sewing, I realized that the first step would be to put together the yoke, flat-fell the seams, do the short pleats on the body, and then sew it all together. Easier said than done! The yoke went together well; I sewed the pleats down too close to the edge, but when I flipped the pieces over I liked how they looked pointing the wrong way. However, it took me a few days of pinning and repinning to get the corners on the seams correct. I had to spend an evening just visualizing it to figure out how to do it, and it's not something I can explain with words. In the end, I didn't do the corners quite right, sewing up the front, back, and yoke-side seams in separate runs, not entirely connecting at the corners.
The side seams were quite tricky. At first I wasn't sure of what to do for those weird slashes in the pattern, but after reading all of the dress diaries on the site I realized that they created zig-zag corners under the arms, and you just have to swivel the fabric around the corners as with the yoke. I sewed the first seam from the bottom of the shirt out to the bottom of the sleeve, and the second from the bottom of the sleeve to the bottom of the shirt - maybe it was just that I'd had practice, but the second one was a lot easier, so maybe that's the right direction to go in.
Adding the button strips (two pieces on each side, sandwiching the yoke pieces) was simple, as was topstitching around the yoke, which was clearly done in the drawing that went with the pattern. I let myself rest a little after that. (NB: I'm not quite sure if I was meant to use four button band pieces - there was no indication, but I didn't like the idea of putting buttons and buttonholes on only one layer of fabric.) The topstitching had the great effect of holding down the fabric where it was puffy around the corners and making me realize that I hadn't screwed it up that much after all.
While at work around this time, I checked out a woman's blouse from the same era that I knew was made to wear with detachable collars, and I took a few pictures for research purposes.
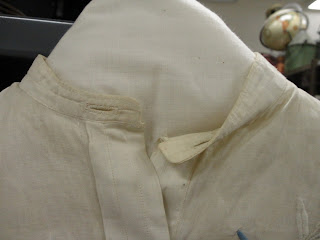

You can see that the shirt has a narrow band collar with buttonholes, so that shirt studs could be used to hold on the collar; the cuffs are also meant to be worn with cufflinks.


There is a waist tape sewn to the back that would tie in the front, to help hold the puff of the blouse in place. I didn't end up adding this, but when I get a chance to try the blouse with a skirt I might find that it needs something similar.

I drafted my own neckband. (I didn't make a collar, though.) Drafted my own cuffs as well, just rectangles with curved corners on the hand edge. I decided that both would be fastened with buttons rather than cufflinks, as I have buttons and don't have cufflinks.
The buttons I used came from my mom's large collection; they're shiny silver plastic with round fake mother-of-pearl centers. Obviously the plastic isn't period-correct, but I've seen a lot of buttons and cufflinks and shirt studs of the period that look extremely similar.
Finished pictures:


Oh, and because I don't think I've ever posted corset pictures - my 1911 corset. It's far too big in the hips - it nearly laces shut in the back ... over my jeans.


I always have a hard time explaining exactly what I consider my sewing level to be, because I really haven't made that many things and I don't always sew neatly or properly, but I do have knowledge of various techniques, I have a deep well of enthusiasm that lets me fling myself headlong into any sewing project (my grandmother says she's impressed with my enthusiasm when she means "you really ought to slow down, you're not doing things right"), and I'm decent at figuring out puzzles. So I put myself down as an "ambitious intermediate" sewer. This pattern is equally difficult to categorize. It's got only a few pieces, it doesn't require a very close fit anywhere but the shoulders, and there's no armscye so you don't have to worry at all about setting in sleeves - however, all the corners require either a lot of experience at machine sewing and/or a willingness to sit down with some practice fabric and fiddle with it for a while until you've gotten the hang of them. I would say it's an intermediate pattern, but not necessarily one every intermediate sewer would be happy to do?
To sum up, the VPLL Checklist:
- Pattern: Ladies Blouse #0219
- My Skill Level: I would call myself an "ambitious intermediate" - I'm not great at cutting and piecing and fitting, but I definitely will try anything that strikes my fancy.
- Pattern Rating: 4 - The cut-in-one sleeves make it harder to alter for fit, but do mean that you completely avoid the dreaded Sleevil.
- Pattern Skill Level: Hm. Intermediate, I think, if you're ambitious and willing to do a practice run before making it in your nice fabric. It's actually kind of simple as a pattern, it just has those tricky corners.
- Instructions: None were given, but it was pretty straightforward to puzzle out. I don't think any instructions could have helped me do those corners, anyway.
- Fit: I did expect it to be a bit small for me, and it was. This mostly showed itself in the shoulders.
- Alterations: I altered only for fit, rather poorly. Unless leaving out the detachable collar counts as an alteration.
- Other Notes: 1) Those corners are tricky, in case I haven't made that clear. 2) The white linen collar requires a band collar on the blouse, which technically ought to have buttonholes on it for studs, but it's probably easier just to use buttons.


Typos, typos. You did a nice job on both. Is there a way to make the corset fit better without taking much of it apart...or gaining 50 pounds?
ReplyDeleteThank you! I feel like I ought to be able to take darts in it or something, but I'm a bit leery about trying it. The fabric was fairly cheap, I could see treating it as a mockup, taking the boning out, and remaking it in something else with narrower hips. I was trying to leave ease there to let me lace my waist tighter, but I don't think I did it right.
Delete