Jacket progress
(This new Blogger interface! I like it on its own, very clean, but it's hard to switch to.)
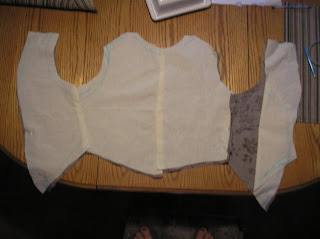
So, I have done quite a lot on the jacket since Mom draped the pieces on me last Wednesday. On Sunday, I pinned the muslin pieces together and tried them on over my stays in front of my mirror: I was worried that Mom had put too much ease into it and it would be baggy, and this turned out to be a bit true. I raised the waist a bit, took the shoulder seam in on the back side, and took the side seams in on the front and back (although they should have been placed further back in the first ... place) as the back had a lot of ease in it. When I was satisfied, I cut out the pieces from my linen - which I had bought a year ago to make into Jacket C on the same page of Patterns of Fashion I, which I partially made up and then found that it was too small and way too short; on the Fashion Fabrics Club website, it looked sort of like a painted natural linen, which isn't something I've seen on extant clothing, but it seemed like a good idea at the time. When it came, it turned out to have a bigger print than I thought and to be kind of stiff and thick, but I used and am using it anyway.
Anyway. I put the center seam together first, using the three-layers-and-backstitching method (two of outer fabric and one of lining; other side of lining slip-stitched on top) from the jacket in Costume Close-up, but it was really thick and the stitches really stand out, so after that I switched to the running-stitch method for the side seams.
While I was doing the proper right side seam, I realized that the left front piece was the slightest bit too short, so I pieced in a thin sliver to both the lining and the bodice and then did the seam. After that, I had to think about the sleeves.
The first jacket turned out too small, as I said, and so the sleeves were kind of short and thin. Still, I was unwilling to totally cut out new sleeves when these were mostly good, so I unpicked the topstitching holding the muslin linings to the linen and pieced in 2" wide, slightly tapering inserts to each piece and then put them back together. I sewed in the left sleeve to make sure it would fit, and immediately started having doubts. See, these sleeves are a bit ... short.
However, all was not lost! There were still the cuffs. Instead of the very shaped winged cuffs of that jacket, though, I used the rectangular pieces I'd cut out for Jacket C. They were meant to be lined, but as the linen is so stiff I thought I wouldn't bother, and I just turned the fabric under once and stab-stitched it down. Then I put in two pleats and top-stitched them down as well, and pinned the cuff in place.
The cuff lengthens the sleeve by about 3.5"! In the 1740s, where I'm aiming, the sleeves are often all different lengths - some to just above the elbow, some to it, some past it - so this is good. Actually, what is most getting to me about the sleeves now is that they really, really should have some shift showing past them: I'm using my thesis project shift, which has narrow sleeves to above my elbow. Unfortunately, there's really nothing I can do about that now, as I have roughly a week to finish this and make a cap as well.
Now I have both sleeves attached and both cuffs tacked on. What is left is to scale up and adjust the jacket's skirt in muslin and linen, sew that on with the same method as the side seams, fold in and topstitch the open bits (around the opening and the skirt), put in the six eyelets for lacing, and quickly make up a stomacher from the same linen. At this point, I think that topstitching is going to take the most time, so I'd better get started on the skirt tomorrow morning, before I go to the museum.
A few other pictures I don't think I uploaded:
So, I have done quite a lot on the jacket since Mom draped the pieces on me last Wednesday. On Sunday, I pinned the muslin pieces together and tried them on over my stays in front of my mirror: I was worried that Mom had put too much ease into it and it would be baggy, and this turned out to be a bit true. I raised the waist a bit, took the shoulder seam in on the back side, and took the side seams in on the front and back (although they should have been placed further back in the first ... place) as the back had a lot of ease in it. When I was satisfied, I cut out the pieces from my linen - which I had bought a year ago to make into Jacket C on the same page of Patterns of Fashion I, which I partially made up and then found that it was too small and way too short; on the Fashion Fabrics Club website, it looked sort of like a painted natural linen, which isn't something I've seen on extant clothing, but it seemed like a good idea at the time. When it came, it turned out to have a bigger print than I thought and to be kind of stiff and thick, but I used and am using it anyway.
Anyway. I put the center seam together first, using the three-layers-and-backstitching method (two of outer fabric and one of lining; other side of lining slip-stitched on top) from the jacket in Costume Close-up, but it was really thick and the stitches really stand out, so after that I switched to the running-stitch method for the side seams.
 |
| From the inside ... |
 |
| ... and the outside. |
 |
| And a close-up (I use half-backstitch rather than backstitch) |
While I was doing the proper right side seam, I realized that the left front piece was the slightest bit too short, so I pieced in a thin sliver to both the lining and the bodice and then did the seam. After that, I had to think about the sleeves.
The first jacket turned out too small, as I said, and so the sleeves were kind of short and thin. Still, I was unwilling to totally cut out new sleeves when these were mostly good, so I unpicked the topstitching holding the muslin linings to the linen and pieced in 2" wide, slightly tapering inserts to each piece and then put them back together. I sewed in the left sleeve to make sure it would fit, and immediately started having doubts. See, these sleeves are a bit ... short.
 |
| Oh dear, I look like a dork. |
However, all was not lost! There were still the cuffs. Instead of the very shaped winged cuffs of that jacket, though, I used the rectangular pieces I'd cut out for Jacket C. They were meant to be lined, but as the linen is so stiff I thought I wouldn't bother, and I just turned the fabric under once and stab-stitched it down. Then I put in two pleats and top-stitched them down as well, and pinned the cuff in place.
 |
| Not too bad! If very blurry. |
The cuff lengthens the sleeve by about 3.5"! In the 1740s, where I'm aiming, the sleeves are often all different lengths - some to just above the elbow, some to it, some past it - so this is good. Actually, what is most getting to me about the sleeves now is that they really, really should have some shift showing past them: I'm using my thesis project shift, which has narrow sleeves to above my elbow. Unfortunately, there's really nothing I can do about that now, as I have roughly a week to finish this and make a cap as well.
Now I have both sleeves attached and both cuffs tacked on. What is left is to scale up and adjust the jacket's skirt in muslin and linen, sew that on with the same method as the side seams, fold in and topstitch the open bits (around the opening and the skirt), put in the six eyelets for lacing, and quickly make up a stomacher from the same linen. At this point, I think that topstitching is going to take the most time, so I'd better get started on the skirt tomorrow morning, before I go to the museum.
A few other pictures I don't think I uploaded:
 |
| Probably the best shot of me in a sleeveless chemise and my stays |
 |
| Very skewed shot of a late 1830s bodice in the graduate study collection at FIT that I am making one day |
 |
| And have a picture of the pocket I made in a little downtime last year |


Oh, that linen is really cool! I've never seen a painted linen, and it looks awesome (if a bit thick and stiff for you :).
ReplyDeleteLove the blue stays, they give you a great shape!
I like how it looks more now, but yeah, it's a good lesson for not buying fabric online (which I have learned before and will probably have to learn again).
ReplyDeleteThanks! I wish I'd put straps on the stays, but overall I'm pretty satisfied with them.